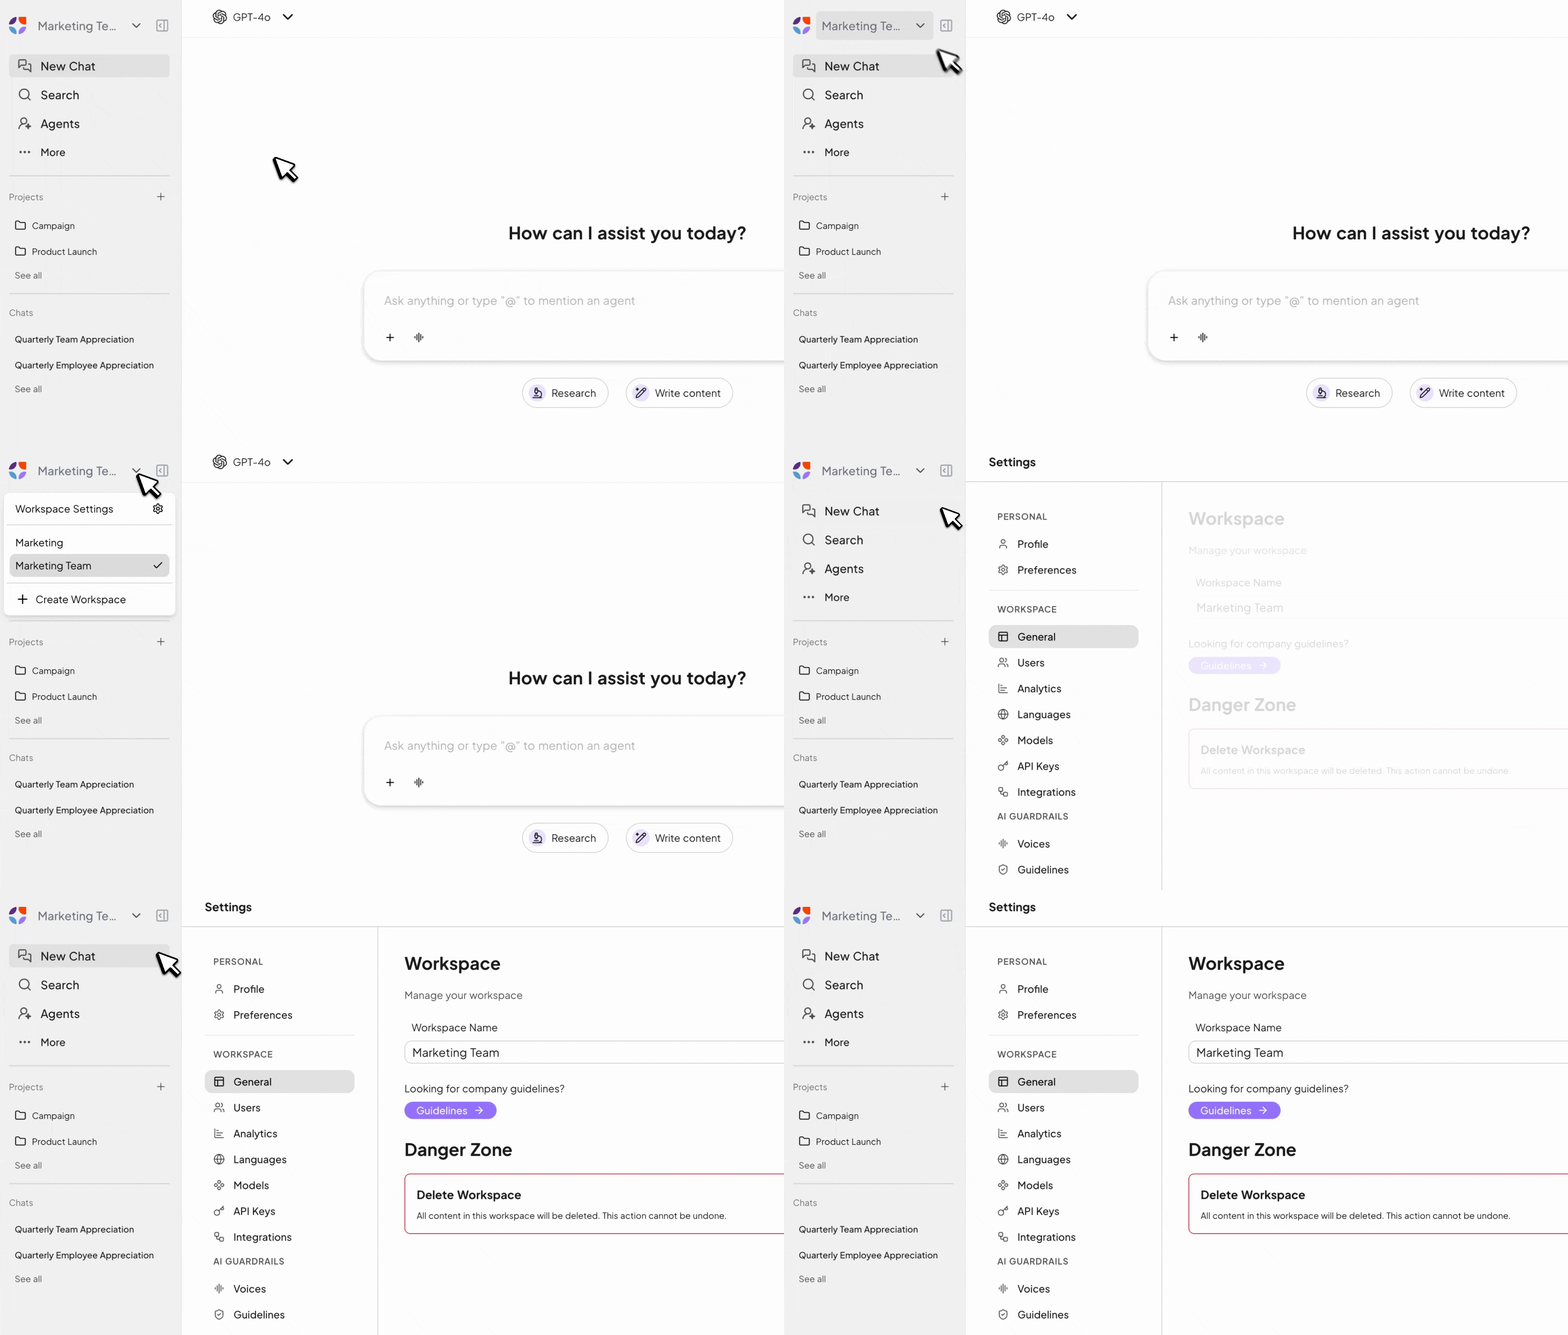
- Secure Workspaces: Separate workspaces for teams, departments, or projects.
- Targeted Knowledge Sources: Each workspace has its own knowledge base.
- Individual Access Rights: Users are granted specific permissions per workspace.
- Flexible Switching: Easy navigation between workspaces ensures clarity and organization.
Only admins and superadmins have access to the workspace settings.
Managing a workspace
Open workspace settings by clicking the arrow next to your workspace name and selecting the gear icon. How to create a new workspace:
Click the arrow next to your workspace name and select “+Create Workspace.”
- Enter a short workspace ID and a workspace title.
- Invite all registered users to the new workspace or add specific users after creation.
- Click “Create Workspace” to save the new workspace.
Users can easily switch between workspaces without losing track. Each workspace can be assigned to specific departments, projects, or teams, keeping all relevant information and documents centrally organized.
- Click your current workspace.
- Select the desired workspace from the list.
General
Configure your workspace’s basic settings. Change logo: Here you can upload or change your workspace logo. For example, you can use your company logo, a department logo, or a project logo. Workspace Name: Give your workspace a clear and descriptive name. For example: “London City Marketing”.Analytics
The Analytics feature in your workspace settings provides valuable insights into how your team is using nuwacom. As a workspace admin, you can monitor activity, identify trends, and make informed decisions to increase engagement and maximize value. Go to Settings > Analytics to access the dashboard. Use the date picker to adjust the time range for your analysis. What you can track:- Workspace overview
Instantly see how many users, agents, and pieces of content exist in your workspace. - Messages per day
See how many AI interactions take place in your workspace over time. - Active users per day
Understand how many users are engaging with the platform daily.
Languages
Define the available languages for content and briefings in nuwacom. The order determines how they appear to users. Example: Set “German” as the primary language and add “English” as a secondary one. New content will be created in German by default. Use the plus icon to instantly translate the content into English.
Models
Define the available AI models for your workspace. Image Generation Model:Set the default image model for your workspace – useful for tasks involving visuals, such as graphics or illustrations. Language Models:
Choose which language models users can access in your workspace. These are available in chat, content generation, and agent creation.
- Use Filter Options: Filter by providers like OpenAI, Anthropic, Google, Meta, Mistral, and Cohere to refine your selection.
- EU-Hosted vs. US-Hosted Models: Choose between EU- or US-hosted models for flexibility and compliance with local regulations.
- Activation Toggle: Enable or disable models to optimize your workflow quality and efficiency.
API Keys
As the admin of a space, you can manage all API keys. API keys are used to authenticate requests to the nuwacom API. You can create new keys or revoke existing ones.- Create a new API key
- API documentation: https://developers.nuwacom.ai/guides/introduction
Connectors (Beta)
Set up connectors in your workspace while ensuring security and data privacy. Decide which connectors can be used by your team and within the workspace. How to manage connectors:- Navigate to your workspace settings.
- In the settings menu, select Connectors.
- Click Manage connectors.
- Toggle connectors on or off to control which ones are available in the workspace.
- Complete the authentication process.
- In the Connected accounts list, click the lock icon next to the connector you want to share.
- In the dialog, select the team members or workspace, then click Done.
AI Guardrails
Set communication styles, brand guidelines, and quality standards workspace-wide.Voices
This feature allows you to analyze, save, and make specific writing styles available across the entire workspace. Team members can easily select and use these styles during content creation to ensure consistent, brand-compliant communication. You have two options to add a voice:- Identify Voice (Recommended): Let the AI analyze and define your style based on writing samples or websites. You can then manually adjust it if needed.
- Enter Manually: Describe the tone using characteristics like formal or informal, emotional or neutral, subjective or objective, consistent or varied.
Guidelines
The guidelines are automatically applied by the AI to every response. This ensures that all content—whether answers, social media posts, or blog articles—always matches the desired communication style, wording, and brand rules. Enter general guidelines for this workspace, for example:- Company overview
- Brand rules
- Wording
Download Guidelines-Template
This document is a sample template for Guidelines. It shows how you can define your own rules for language, style, and wording to ensure that AI-generated content is consistent and brand-compliant. Use it as a template and add your company-specific guidelines.
Delete Workspace
Go to “General” in the settings menu.- Click “Delete Workspace” at the bottom under “Danger Zone.”
- Enter the workspace name in the pop-up window.
- Click “Delete Workspace.”