> ## Documentation Index
> Fetch the complete documentation index at: https://docs.nuwacom.ai/llms.txt
> Use this file to discover all available pages before exploring further.
# Workspace
> Organize and manage your workspace
Workspaces help you structure collaboration – clearly separated, securely managed, and tailored to your teams.
* **Secure Workspaces:** Separate workspaces for teams, departments, or projects.
* **Targeted Knowledge Sources:** Each workspace has its own knowledge base.
* **Individual Access Rights:** Users are granted specific permissions per workspace.
* **Flexible Switching:** Easy navigation between workspaces ensures clarity and organization.
***
Only admins and superadmins have access to the workspace settings.
## Managing a workspace
Open workspace settings by clicking the arrow next to your workspace name and selecting the gear icon.
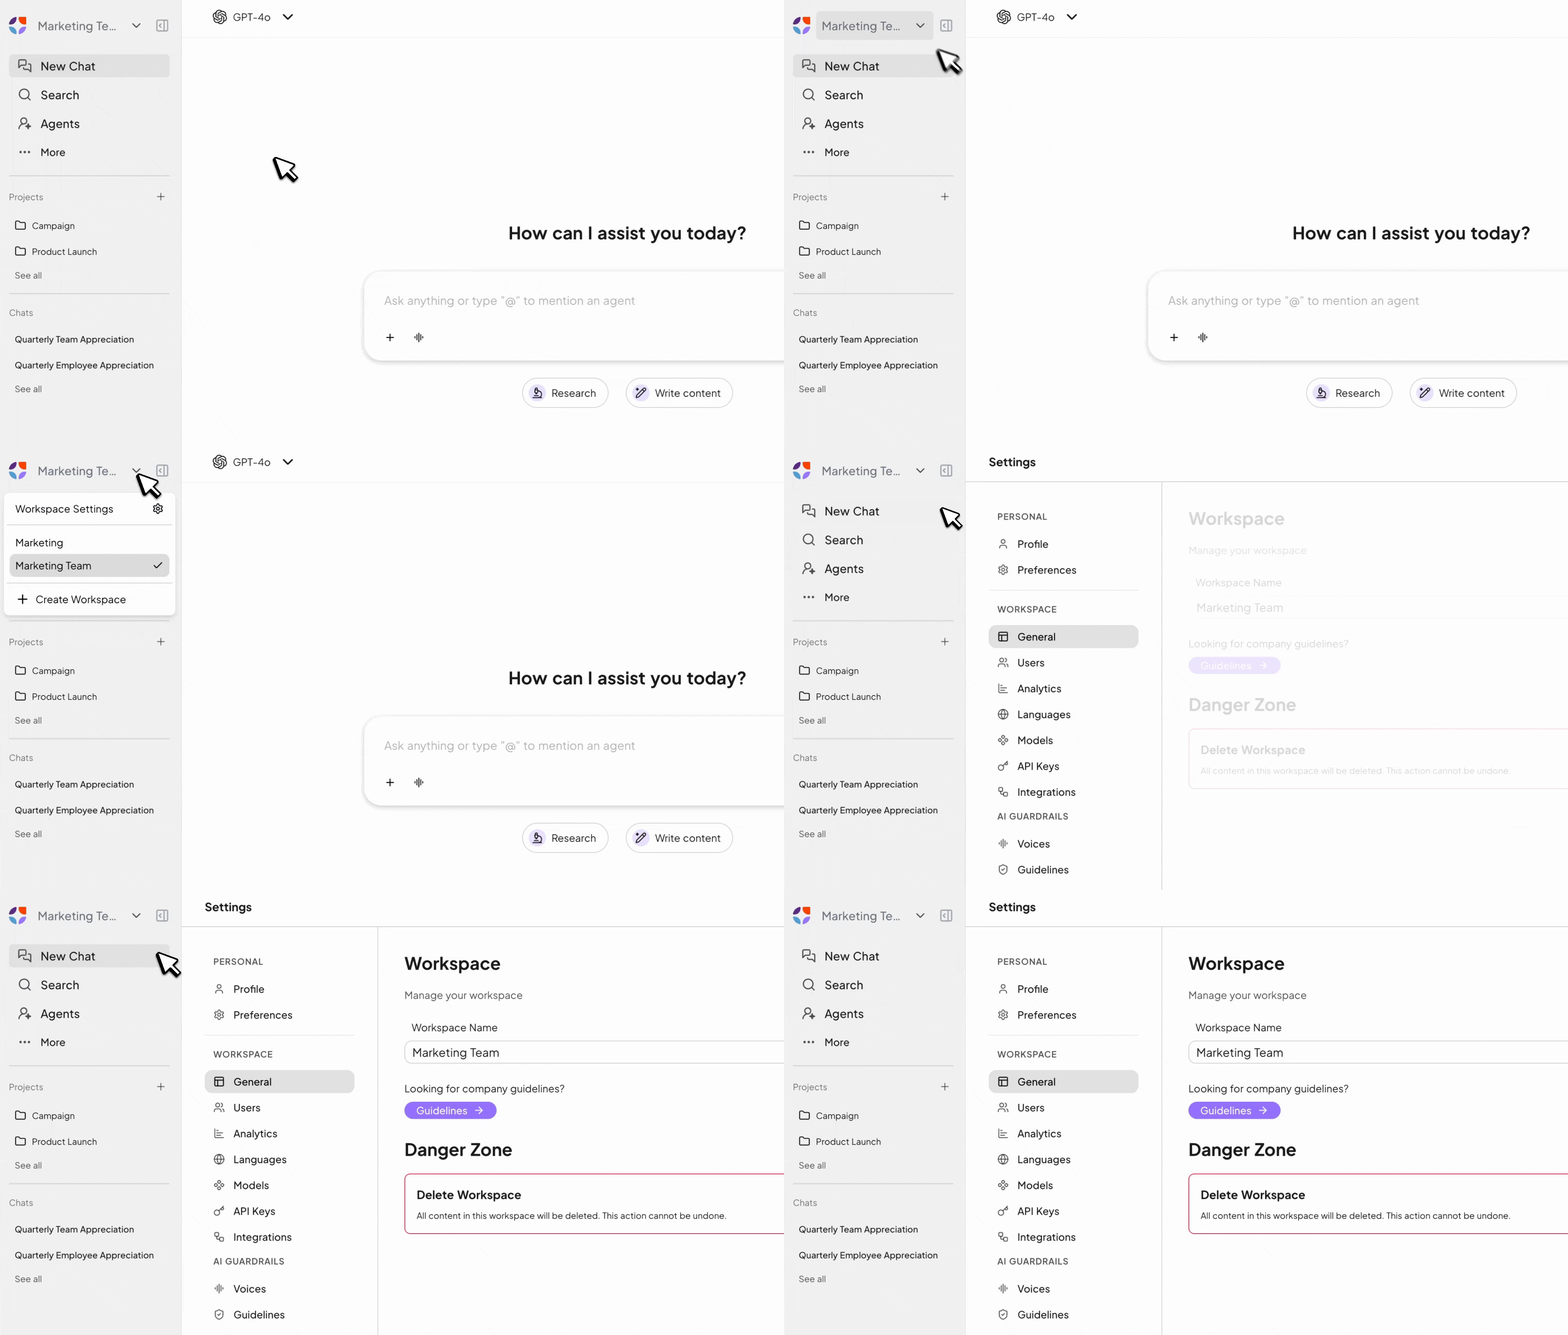
**How to create a new workspace:**
Click the arrow next to your workspace name and select "+Create Workspace."
* Enter a short workspace ID and a workspace title.
* Invite all registered users to the new workspace or add specific users after creation.
* Click "Create Workspace" to save the new workspace.
Users can easily switch between workspaces without losing track. Each workspace can be assigned to specific departments, projects, or teams, keeping all relevant information and documents centrally organized.
**How to switch between workspaces:**
* Click your current workspace.
* Select the desired workspace from the list.
***
## **General**
Configure your workspace's basic settings.
**Change logo:** Here you can upload or change your workspace logo. For example, you can use your company logo, a department logo, or a project logo.
**Workspace Name:** Give your workspace a clear and descriptive name. For example: "London City Marketing".
***
## **Analytics**
The Analytics feature in your workspace settings provides valuable insights into how your team is using nuwacom. As a workspace admin, you can monitor activity, identify trends, and make informed decisions to increase engagement and maximize value.
Go to **Settings > Analytics** to access the dashboard. Use the date picker to adjust the time range for your analysis.
What you can track:
* **Workspace overview**\
Instantly see how many users, agents, and pieces of content exist in your workspace.
* **Messages per day**\
See how many AI interactions take place in your workspace over time.
* **Active users per day**\
Understand how many users are engaging with the platform daily.
Tip: Combine analytics insights with feedback from your team to continuously improve your AI workflows.
***
## **Languages**
\
Define the available languages for content in nuwacom. The order determines how they appear to users.
*Example:* Set "German" as the primary language and add "English" as a secondary one. New content will be created in German by default. Use the plus icon to instantly translate the content into English.
***
## **Models**
In the Models section, you define which AI models are available in your workspace. Auto Mode is recommended as the default setting, as nuwacom automatically selects between a fast instant model and a more powerful model. This ensures that team members receive suitable responses without having to choose a model manually each time.
If needed, team members can override the selection in the chat and manually choose a different available model.
### Default Workspace Model
The default workspace model determines which model is used by default in your workspace.
To set a default workspace model:
1. Open the workspace settings.
2. Navigate to **Workspace > Models**.
3. Open the dropdown menu under **Default Workspace Model**.
4. Select **Auto** or a specific model.
The selected model will then be automatically preselected whenever team members start a new chat.
**Best Practice:** Select **Auto** so that nuwacom automatically chooses the most suitable model for each request. We recommend this setting because it provides a strong balance between response quality, speed, and cost efficiency while always benefiting from the latest model setup.
### Auto Mode
Auto Mode automatically selects the most appropriate model based on the complexity of the request. For simple tasks, nuwacom uses a fast instant model, for example for short answers, translations, or summaries. For more demanding tasks such as complex analyses, software development, or in-depth research, a more powerful model is used.
This allows team members to receive suitable responses without having to decide which model is best suited for a particular task.
### **Image Generation Model**
Here, you can define the default image generation model for your workspace. This is particularly useful for tasks that require visual content, such as creating graphics or images. The following image generation models are available:
* Gemini 2.5 Flash Image (Nano Banana) (EU-hosted)
* Imagen 4.0 (EU-hosted)
* Imagen 4.0 Fast (EU-hosted)
* GPT Image 2.0 (EU-hosted)
* FLUX 1.1 Pro Ultra (EU-hosted)
* FLUX 1 Context Pro (EU-hosted)
* FLUX 2 Pro (EU-hosted)
* Gemini 3 Pro Image (Nano Banana Pro) (Global-hosted)
* Gemini 3.1 Flash Image (Nano Banana 2) (Global-hosted)
**Note:** Imagen 4.0 (EU-hosted) is used by default. As an admin, you can select a different image model under **Workspace Settings > Models**.
### **Video Generation Model**
The following models are available for video generation:
* **Veo 2** (EU-hosted)
* **Veo 3** (US-hosted)
By default, Veo 2 (EU-hosted) is used for video generation in your workspace. As an admin, you can change the model under **Workspace Settings > Models > Video Generation Model** if needed.
### **Enabled Models**
Choose which language models are available to users in your workspace.
* **Use filter options:** Filter models by providers such as OpenAI, Anthropic, Google, Meta, Mistral, and Cohere to find the right selection.
* **EU-hosted and US-hosted models:** Choose between EU-hosted and US-hosted models to meet regional requirements and data protection preferences.
* **Use activation toggles:** Enable or disable models as needed to optimize the efficiency and quality of your workflows.
[👉 View all available AI models](https://docs.nuwacom.ai/resources/aimodels)
***
## Connectors
With connectors, you can link external tools to your workspace. This allows agents to access data and execute tasks directly within your systems.
You centrally control which connectors are available, connect accounts, and define whether they can be used only by you, your team, or the entire workspace. This way, you combine efficient workflows with full control over access and data.
**Apps**
Apps are preconfigured integrations for common tools such as email, calendars, or collaboration platforms.
They are quick to set up and allow agents to analyze content, retrieve information, or perform actions. Ideal for getting started quickly with automated workflows.
**MCP Servers**
MCP servers enable deeper and more flexible integrations than apps.
Using the MCP standard, you can connect almost any system and execute complex actions. These capabilities are then directly available within agents and workflows.
MCP servers are primarily intended for administrators and advanced teams that want to implement custom automations and system integrations.
**How to manage connectors:**
1. Navigate to your workspace settings.
2. In the settings menu, select *Connectors*.
3. Click Manage connectors.
4. Toggle connectors on or off to control which ones are available in the workspace.
5. Complete the authentication process.
Decide whether a connector remains private or is shared with team members or the entire workspace. Choose carefully which connectors to share, as sharing grants access to all available data.
1. In the Connected accounts list, click the lock icon next to the connector you want to share.
2. In the dialog, select the team members or workspace, then click Done.
With nuwacom, you can connect your preferred business tools directly to your agents – making it easy to automate workflows and complete daily tasks more efficiently.
[**👉 Learn how to connect connectors to your agents here.**](https://docs.nuwacom.ai/product/connectors#watch-the-video-to-learn-how-to-connect-slack-with-your-agents)
***
## AI Guardrails
Set communication styles, brand guidelines, and quality standards workspace-wide.
### **Voices**
This feature allows you to analyze, save, and make specific writing styles available across the entire workspace. Team members can easily select and use these styles during content creation to ensure consistent, brand-compliant communication.
You have two options to add a voice:
* **Identify Voice (Recommended):** Let the AI analyze and define your style based on writing samples or websites. You can then manually adjust it if needed.
* **Enter Manually:** Describe the tone using characteristics like formal or informal, emotional or neutral, subjective or objective, consistent or varied.
### **Guidelines**
The guidelines are automatically applied by the AI to every response. This ensures that all content—whether answers, social media posts, or blog articles—always matches the desired communication style, wording, and brand rules.
Enter general guidelines for this workspace, for example:
* Company overview
* Brand rules
* Wording
Click Save to apply your entries.
This document is a sample template for Guidelines. It shows how you can define your own rules for language, style, and wording to ensure that AI-generated content is consistent and brand-compliant. Use it as a template and add your company-specific guidelines.
👉 [Read more](https://docs.nuwacom.ai/product/policy-hierarchy) to understand how policies, knowledge sources, and system instructions are prioritized when you submit a prompt.
***
## Delete Workspace
Go to "General" in the settings menu.
* Click "Delete Workspace" at the bottom under "Danger Zone."
* Enter the workspace name in the pop-up window.
* Click "Delete Workspace."
All content in this workspace will be deleted. This action is irreversible.